Solar Combiner Box Maintenance Checklist: A Preventive Schedule
Publicado: Autor: Rachel
Solar combiner box maintenance is the cheapest protection a PV asset can buy. A short scheduled inspection finds a hardening door gasket, a slack terminal or a saturated desiccant while they are still minor defects; the same three found two years later are an earth fault, a discoloured busbar and a lost production week. This guide gives you a preventive programme you can copy: what to check, how often, in what order, and what to write down.
It is deliberately not a fault-finding guide. If a fuse has already operated, a breaker has already tripped or an SPD window is already red, you are past prevention and into diagnosis — that work belongs in our solar combiner box troubleshooting guide, which follows symptom, isolation, measurement, root cause, fix, prevention. Here the subject is the schedule that stops those faults arriving. For the components inside the enclosure, start with what is a solar combiner box; for where each string fuse, breaker and SPD sits in the circuit, the solar combiner box wiring diagram is the reference.
Why a Schedule Beats Reactive Repair
Almost every expensive combiner box failure has a cheap early warning. A joint that was not torqued to the manufacturer’s figure warms up slowly; a gasket losing its elasticity lets in a trace of water; a desiccant sachet saturates and stops absorbing. None of these are visible from the ground, so they only surface when someone opens the enclosure on a known date and looks.
A solar combiner box maintenance programme does three things ad-hoc attention cannot. It turns a reading into a comparison, because a measurement set against last year’s measurement is evidence and a measurement on its own is just a number. It makes the result independent of the person, so a different technician in a different season reaches the same conclusion. And it creates a defensible record for the asset owner, the insurer and any warranty discussion after an incident.
Write the intervals per site. The environment drives them: coastal and agricultural installations need more frequent attention than temperate inland ones, and a dusty desert site needs different attention again.
Safety Prerequisites Before Any Inspection
These are conditions that must be true before an enclosure is opened, not steps to improvise on site. The full field procedure belongs to fault work; the minimum a maintenance visit is planned around is this.
Competent person and a method statement. DC work at the system voltage, planned, permitted and carried out by a qualified technician. Treat the box as dual-supplied — array side and, on battery or hybrid systems, inverter or battery side.
Isolate, verify dead, prove the tester. Open the DC isolator and any string isolation provided. Prove the tester on a known live source, verify dead at the point of work pole-to-pole and each polarity to earth, then prove the tester again.
Respect the array as a live source. Module strings generate whenever there is light. Isolating at the combiner de-energises the busbar side, not the incoming string cables. Never work on energised PV strings, and never assume an open isolator made the array side safe.
PPE for DC. Arc-rated clothing, insulated gloves and a face shield near terminals that could become live; insulated tools; test leads rated for the system voltage.
Load-dependent checks first. Thermal imaging only shows anything while current flows, so it is done under realistic irradiance before isolation. Everything else follows isolation.
Right conditions. Do not open the enclosure in rain, snow or a dust storm, and never insulation-test wet modules — dew depresses a healthy reading and misleads the whole visit.
Spares and documents on site. Correct fuses and matching holders, gaskets, glands and desiccant from the manufacturer’s parts list, plus the string schedule and the last maintenance record.
The Maintenance Frequency Schedule
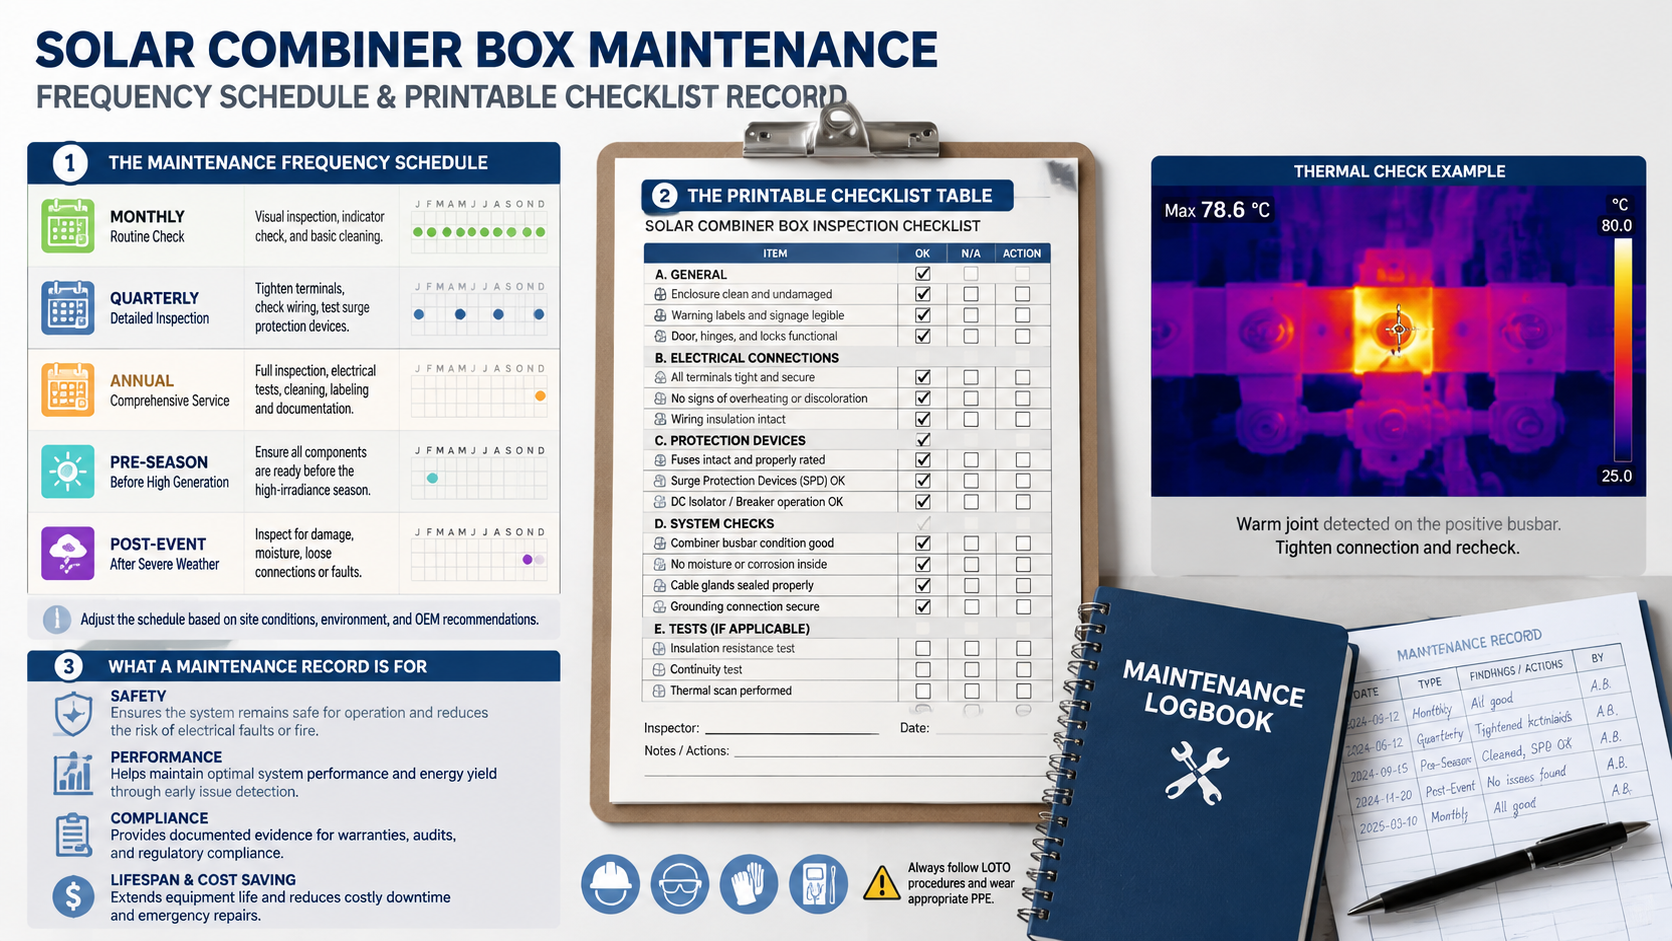
Five intervals cover almost every installation. Your own solar combiner box maintenance intervals belong in the site’s O&M plan, adjusted for climate, access and criticality, and anything the manufacturer or project specification sets takes precedence.
Interval
Enclosure opened?
Typical scope
Carried out by
Monthly
Não
Read monitoring and inverter data: per-string current, alarms, generation against expectation. Walk-by check of the exterior, door, indicators and cable entries. No electrical work.
O&M staff, remote monitoring plus a walk-by
Quarterly
Usually yes
Load-dependent thermal scan, gasket and gland inspection, vent or desiccant check, cleaning of vents, visual check of terminals and busbars, label legibility.
Competent PV technician
Annual
Yes, isolated
The documented verification: torque re-check to datasheet values, fuse and holder condition, SPD status and backup protection, earthing continuity, insulation-resistance testing where the plan requires it, sealing and corrosion review. All results recorded.
Competent PV technician
Pre-season
Yes, isolated
Readiness ahead of the high-irradiance season — and of the severe-weather season in storm or snow climates. Cleaning, sealing, torque, desiccant and spare-parts check.
Competent PV technician
Post-event
Yes, isolated
After lightning, storm, flooding, an arc or thermal incident, a grid disturbance, or any operation of a protective device. Condition and insulation checks before return to service.
Competent PV technician
Most commercial sites run four scheduled visits a year — the quarterly visits — with one of them combined with the annual documented verification, and the pre-season readiness work folded into whichever visit falls before the season. Monthly checks add no visit because they are remote or a walk-by. Post-event visits are triggered, not scheduled. Across a portfolio this becomes a calendar rather than a per-box decision; the fleet view in PV combiner boxes for commercial solar explains how string counts and box arrangements change the workload.
What to Inspect, and Why It Matters
Each item below is a preventive check. Where a defect is found, the corrective work belongs to the troubleshooting guide, not here.
Enclosure, IP seals and door gasket
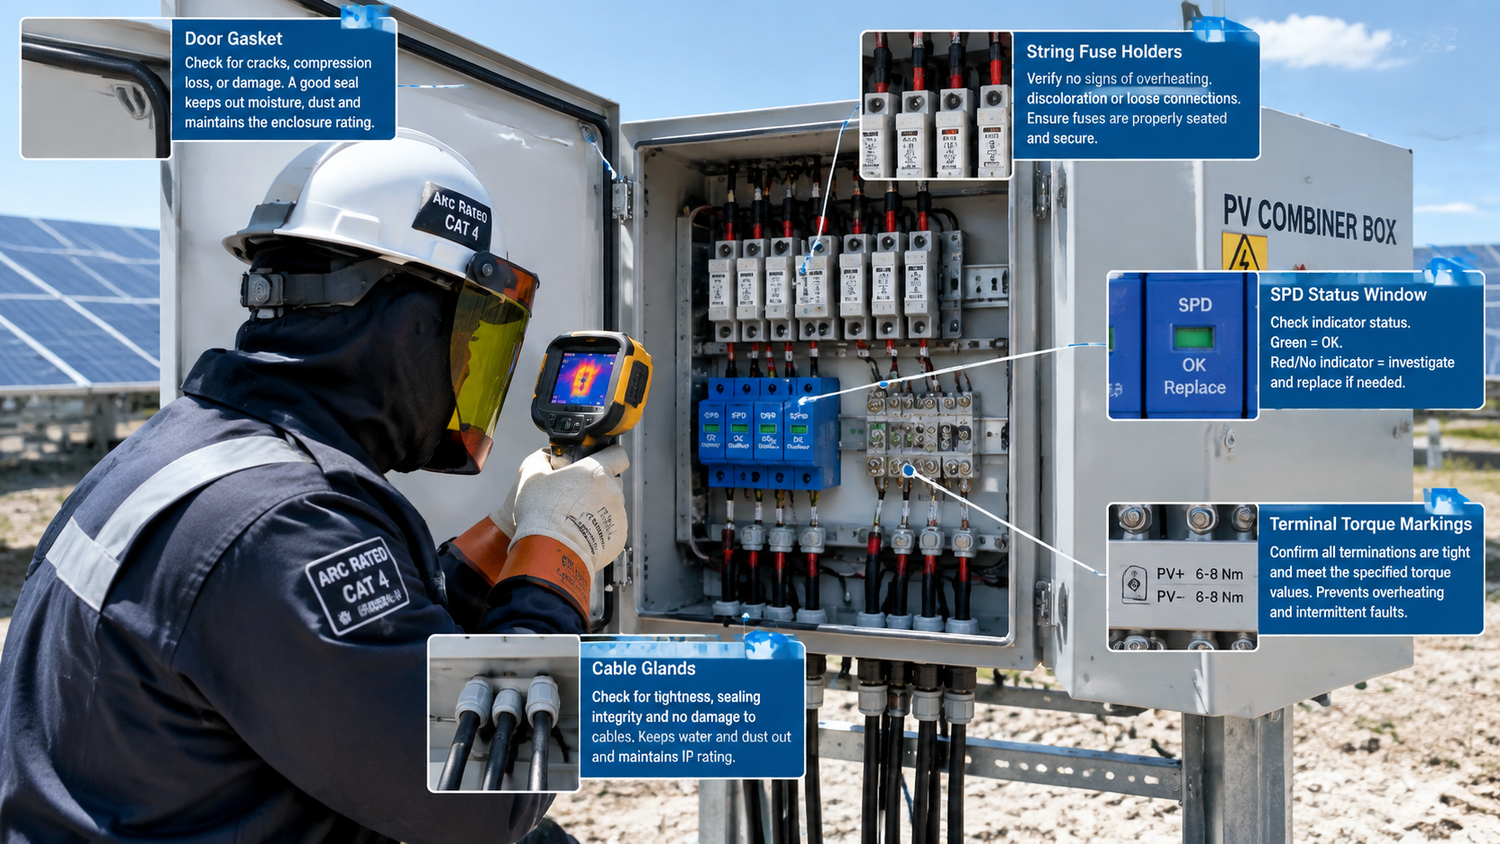
The IP rating is only as good as the day the door was last closed. Check the gasket along its whole length for hardening, compression set, cracking, paint damage or a trapped cable, and look for water tracking, mineral residue and rust at the door edge and lower face. A gasket that has gone hard has already failed, even if no water has arrived yet. Check hinges and the door stop too — a door that does not close squarely cannot compress its gasket evenly.
Glands, cable entries and access
Every entry is a hole in the enclosure. Verify each gland is the right size for its cable, tightened onto the sheath rather than the conductors, with no strain, and that every unused entry still has its blanking plug. Top-face entries are a permanent water risk and worth re-routing at the first opportunity. Clear vegetation and debris from around the box, and check the mounting fixings are sound.
Ventilation, desiccant and condensation
A sealed box still breathes as it heats and cools, and that daily cycle deposits moisture on cool internal surfaces. Check any breather or pressure-compensation element for blockage, replace filter media where the design uses it, and replace desiccant on the manufacturer’s schedule or sooner in humid conditions — saturated desiccant is worse than none, because it holds water next to the terminals. If condensation keeps returning after the seals are correct, the ventilation and enclosure design needs review, not another sachet.
Corrosion
Look for white or green deposits on terminals and busbars, damaged plating, rust weeping from fixings, and dissimilar-metal joints. Corrosion is moisture plus time, so finding it always sends you back to the gasket, glands and ventilation. Where it has reached a busbar or terminal, replace rather than clean — cleaning restores the appearance, not the cross-section.
Terminal torque re-check
Thermal cycling relaxes joints; a relaxed joint runs hotter, which relaxes it further. Re-check torque at the annual visit with a calibrated wrench, using the value published for that specific terminal, fuse holder or device — these values differ between products and must never come from memory or from another box. Mark each joint after checking so the next technician can see it has been visited. Do not over-torque to be safe: excessive torque damages terminals as reliably as a loose one.
Thermal imaging under load
This is the most productive preventive check in a combiner box and it is worthless without load. Scan before isolation, record the irradiance or load current with each image, and compare each joint with an equivalent joint in the same box rather than against an absolute temperature. Fuse holders deserve particular attention: relaxed contact pressure shows as heat at the fuse caps, and it will destroy the next fuse fitted into it.
Fuse continuity and holder condition
With the box isolated and the string identified, verify fuse continuity using the method the manufacturer’s instructions describe, and inspect the holder in the same pass. Heat marks, discolouration, a sprung contact or a fuse sitting loosely all mean the holder is replaced, not just the fuse. Confirm the fitted fuses match the approved string schedule in type, current rating, voltage rating and physical size — an undocumented substitution found during maintenance is a defect worth recording.
SPD status and backup protection
Record the status indication of every SPD, including the ones that look fine, because a record shows whether a device is degrading gradually or was sacrificed in a single event. Check the backup protection that coordinates with it, and its earthing and connecting leads: long, thin or poorly bonded leads raise the residual voltage at the equipment and shorten device life. The indicator states themselves are explained in our post on the red and green SPD window. A consumed SPD module is a scheduled replacement, not a fault, provided you understand why it was consumed.
Earthing and bonding continuity
Confirm the enclosure, door, gland plate and internal earth bar are bonded as designed, and that the main earthing conductor is sound and correctly terminated. Verify continuity with a low-resistance instrument and record the reading, the instrument and its calibration status. Acceptance criteria come from the project specification and the local requirements that apply to the site, not from a remembered figure. Never disconnect or remove protective earthing to silence an alarm.
Labelling, cleaning and spares
Check that enclosure, string and device labels are present and legible, and that the string schedule inside the door matches what is actually installed. Clean dust from vents and the exterior, clear debris, and confirm the spares kit holds the correct fuses, holders, gaskets, glands and in-date desiccant, so a replacement is never a compromise.
The Printable Checklist Table
The table below is the whole programme on one sheet. Print it and carry one copy per enclosure, enter the date and initials for each visit, and transfer anything found into the maintenance record rather than straight into a repair.
Inspection item
What to check
Monthly
Quarterly
Annual
Post-event
Enclosure exterior and access
Fixings, door alignment, hinges, paint damage, debris and vegetation clearance
✓
✓
✓
✓
Door gasket and IP seals
Hardening, cracking, compression set, water tracking, mineral residue
—
✓
✓
✓
Glands and spare entries
Correct size, tightened on the sheath, no strain, all blanks fitted, no top-face entries
—
✓
✓
✓
Ventilation and desiccant
Breather clear, filter media replaced, desiccant in date, no standing water
—
✓
✓
✓
Internal cleanliness
Dust, insect nests, debris, moisture trails, signs of tracking
—
✓
✓
✓
Corrosion
Deposits and rust on terminals, busbars and fixings; dissimilar-metal joints
—
✓
✓
✓
Thermal imaging under load
Terminals, busbars, fuse holders, SPD and device terminals — scanned before isolation, load recorded
—
✓
✓
✓
Terminal torque
Re-checked to the manufacturer’s value with a calibrated wrench, then marked
—
—
✓
✓
Fuse continuity and holder
Continuity of each string fuse, contact condition and heat marks, rating matches the string schedule
—
✓
✓
✓
SPD status and backup protection
Indicator recorded, backup device correct, connecting leads short and well bonded
Visual, where visible
✓
✓
✓
Earthing and bonding
Enclosure, door, gland plate and earth bar bonded; conductor sound; continuity reading recorded
—
—
✓
✓
Insulation resistance
Where the site plan specifies it: strings isolated, modules dry, test voltage appropriate to the system
—
—
✓
✓
Labelling and documentation
Labels legible; string schedule matches what is installed
—
✓
✓
✓
Monitoring and data
Per-string current against expectation, alarms reviewed, channel mapping still correct
✓
✓
✓
✓
Spares on site
Correct fuses, holders, gaskets, glands and desiccant stocked and in date
—
—
✓
✓
What a Maintenance Record Is For
The logbook is the part of the solar combiner box maintenance programme most often skipped and the part that pays for itself: it is the only way to turn a series of visits into a trend.
It sets a baseline. The commissioning values — per-string current, open-circuit voltage, insulation resistance and thermal images taken under load — become the reference every later reading is compared against. Without them, nobody can tell a slowly deteriorating joint from one that was always that warm.
It shows direction of travel. An SPD indicator that changes between two visits records an event. A gasket replaced twice in three years records an enclosure being asked to do something it was not designed for.
It justifies the interval. Three clean annual visits at a benign site justify extending the interval; defects at every visit on a coastal site prove the interval is too short.
It supports warranty and insurance. After a fire, an arc event or a lightning claim, the maintenance history is what shows the asset was managed to a programme.
A workable record is short: date, technician, weather and irradiance, measurements taken, the condition of each checklist item, defects found, action taken, parts used, and the next visit date. Photographs beat a paragraph of description, especially for corrosion, gasket condition and thermal images. Keep it with the site documentation and keep it retrievable — a record nobody can find does not exist.
When an Inspection Finds a Fault
Decide before the visit what happens when something is found, so nobody improvises a repair under time pressure. Three outcomes are enough: record and monitor if the item is within its service condition; schedule corrective work with a date if it is degraded but stable; and stop and diagnose if a protective device has operated, an SPD has reached end of life, insulation resistance is out of specification, or there is evidence of arcing or sustained heat.
In that last case the box is not re-energised until the cause is established. Replacing a fuse or resetting a breaker to see whether it holds destroys the evidence and, on a DC circuit with no natural current zero, risks an arc that will not extinguish.
Perguntas frequentes
How often should a solar combiner box be inspected?
Most sites work to monthly data and visual checks without opening the enclosure, quarterly visits with a thermal scan, one annual documented visit with measurements, and a readiness visit before the high-irradiance or severe-weather season. Many operators combine the annual and pre-season work into a single visit — four scheduled site visits a year, plus post-event inspections after storms, flooding or the operation of a protective device. Always confirm the solar combiner box maintenance interval against the site’s own O&M plan.
Can thermal imaging be done on an unloaded combiner box?
No. A hot joint only produces heat while current flows, so an unloaded box shows nothing and gives false reassurance. Thermal imaging belongs at the start of the visit, under realistic irradiance, with the load recorded alongside the image, comparing each joint with an equivalent joint in the same box.
How do I know what torque to use on combiner box terminals?
From the manufacturer of that specific terminal, fuse holder, breaker or SPD. Torque values are product-specific and published with the device; they are not interchangeable between holders or brands. Use a calibrated wrench, mark the joint once checked, and avoid over-torquing, which damages threads and terminals as surely as leaving them loose.
Why does condensation keep forming when the gasket is fine?
Because a sealed enclosure still breathes. Daily heating and cooling draws moisture-laden air in and deposits condensation on cool surfaces, so a well-sealed box in a humid climate can still fill with water. The countermeasures are a breather or pressure-compensation element, correctly maintained desiccant, and reduced solar gain. If it persists after those are correct, the design needs review.
Is a red SPD indicator a maintenance item or a fault?
Treat it as a scheduled replacement: the device has reached end of life and there is nothing further to test. While replacing it, check the backup protection and the connecting leads, since those are the usual reasons a replacement fails early. If several devices in one box reach end of life together, look for a common event or an earthing problem rather than replacing them again.
Do I need to isolate the array to inspect a combiner box?
Any intrusive work needs the box isolated and verified dead with a proven tester. That does not de-energise the incoming string cables: modules generate whenever there is light, so the array side stays live in daylight. Never work on energised PV strings, and if the inspection needs access to string conductors it must follow a method statement that addresses that hazard.
A maintenance programme is only as good as the enclosure it is written around. If you are specifying combiner boxes for a commercial or utility-scale project and want them built for straightforward servicing — accessible terminals, replaceable gaskets and desiccant, documented torque values, and a string schedule supplied with the unit — start from the solar combiner box range and tell us the string configuration and the environment the box will live in.
Why a solar combiner box needs both a DC MCB and a DC SPD: the division of labour between overcurrent and transient overvoltage protection, why neither device can substitute for the other, how they coordinate on the DC bus including the SPD backup protection requirement, and how the pairing changes between 1000 V DC and 1500 V DC systems.
“Combiner box vs junction box” is one of the most common points of confusion in PV design, and it is not a cosmetic one. The two enclosures look similar on a wall, are both described loosely as “the box where the strings are terminated”, and are not interchangeable. A junction box is a passive termination […]
Solar DC protection is a chain, not a purchase. In one array you can have a reverse current from nine healthy strings into one faulted string, a lightning-induced impulse arriving on the same conductors, and a maintenance team that needs to work on the inverter DC input — three problems that share a cable and […]