If you’ve ever faced a blown fuse and wondered what those numbers really mean, you’re not alone. Understanding fuse rating is crucial—not just for replacing a fuse but for protecting your circuit and preventing costly damage or fire hazards. From ampere rating to interrupting capacity and knowing when to choose between a fast-acting fuse or a time-delay fuse, these details can make all the difference in electrical safety and performance. In this guide, we’ll cut through the technical jargon and show you exactly how to decode fuse specifications—and select the perfect GA&DA fuse to keep your systems running smoothly and securely.
The Core Components of a Fuse Rating
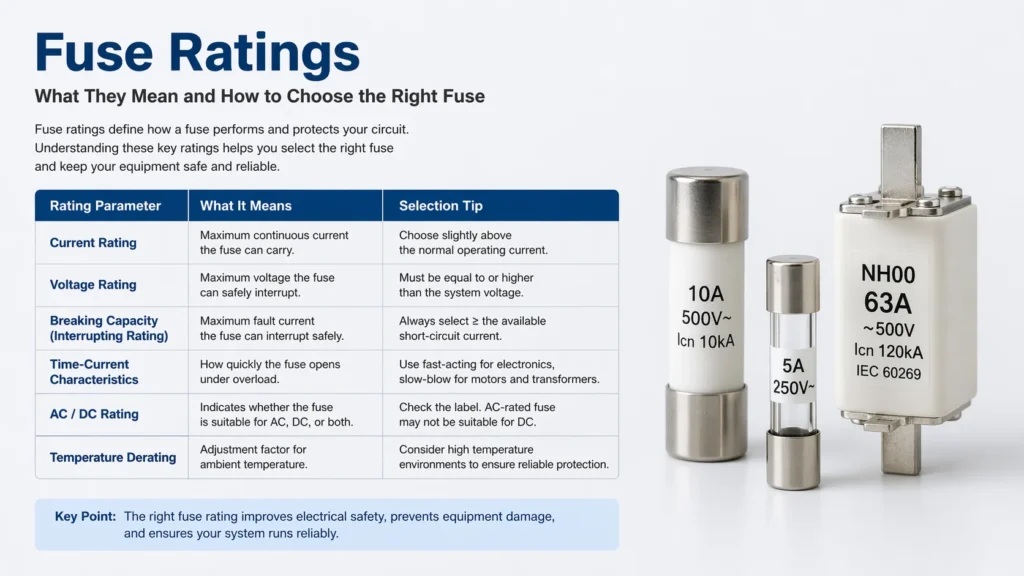
When choosing the right fuse, understanding the fuse rating is essential. It’s more than just a number—it reflects several key factors designed to protect your circuits safely and effectively. Let’s break down the core components:
Current Rating (Amperage)
- Definition: The current rating, often called the ampere rating, is the maximum continuous current a fuse can carry without blowing.
- 135% & 200% Rules:
- Ideally, select a fuse rated at 135% of the normal operating current for steady electronic loads.
- For circuits with occasional brief surges, fuses rated up to 200% can sometimes be appropriate, but only if the fuse’s time-current characteristic allows it.
- Never replace with higher amps:
- Using a higher amp fuse to avoid nuisance blowing is dangerous. It compromises circuit protection and risks equipment damage or fire. Always match or slightly oversize according to specs, never exceed.
Voltage Rating
- Common misunderstanding: Voltage rating is often overlooked but is critical. It determines the maximum voltage the fuse can safely interrupt without arcing.
- AC vs DC ratings:
- AC fuses and DC fuses are rated differently because DC circuits don’t have zero-crossing points, making arc suppression harder.
- A fuse must meet or exceed the system’s voltage—never use one with a lower voltage rating than the circuit voltage.
- Rule of Thumb:
- Always choose a fuse with a voltage rating equal to or higher than your system voltage, whether AC or DC.
Interrupting Rating (Breaking Capacity)
- Short Circuit Current Rating: This is the maximum fault current the fuse can safely interrupt without exploding or failing.
- Low vs High Breaking Capacity:
- Low breaking capacity fuses are fine for small, low-energy circuits with limited fault current.
- High breaking capacity fuses are required for industrial and high-power applications where fault currents can be thousands of amperes.
- Why it matters: Using a fuse with insufficient interrupting capacity can result in catastrophic failure, posing severe safety risks and damage to expensive electronics.
Understanding these three components—the ampere rating, voltage rating, and interrupting rating—is foundational for selecting the right fuse rating. It ensures your equipment gets reliable overcurrent protection suited to the exact electrical load and environment. For precision and safety, GA&DA catalog offers a wide range of fuses with clear ratings tailored to global standards and diverse applications.
Beyond the Numbers: Time-Current Characteristics
When talking about fuse rating, it’s not just about the amperage or voltage; the time-current characteristics play a huge role in protecting your electrical load properly.
Fast-Acting (F) Fuses: Perfect for Sensitive Electronics
Fast-acting fuses blow quickly when the current exceeds the fuse rating, making them ideal for sensitive electronics like semiconductors and digital devices. These fuses offer precise overcurrent protection by reacting almost immediately, preventing damage from short circuits or sudden surges.
Time-Delay / Slow-Blow (T) Fuses: Handling Inrush Currents
Slow-blow or time-delay fuses are designed to tolerate brief current surges without blowing immediately. This makes them perfect for equipment with high inrush current, such as motors, transformers, and capacitors. These fuses can handle current spikes up to 135% or more of their rated ampacity for a short period, allowing startup currents to pass without nuisance trips.
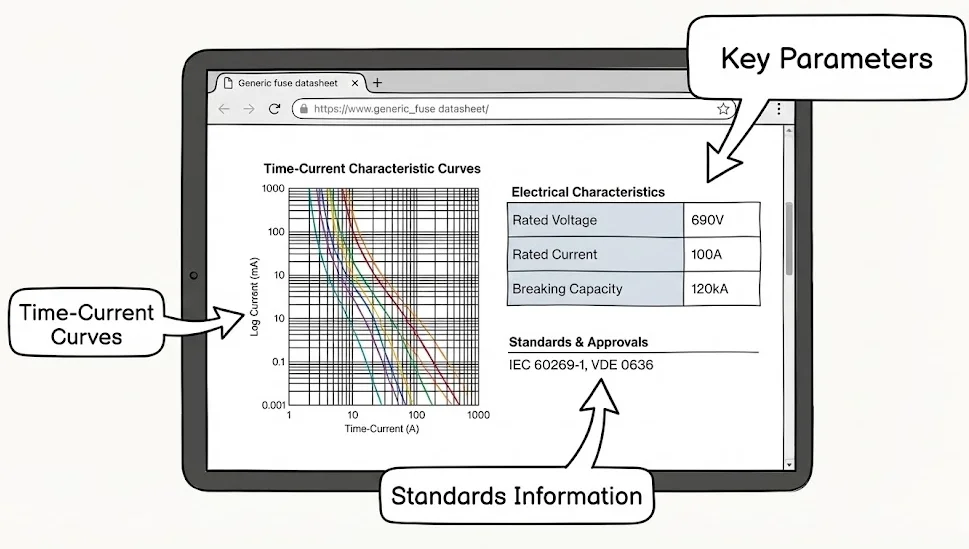
Understanding Time-Current Curves: Reading Fuse Blow Curves
Fuse manufacturers provide time-current curve graphs, showing how long a fuse takes to blow at different current levels. Here’s how to read them simply:
- The horizontal axis shows the current multiple of the fuse rating (e.g., 2× or 5× amperes).
- The vertical axis indicates the time to blow, usually in seconds.
- Curves slope downward — higher currents blow the fuse faster.
By checking these curves, you can pick the right fuse that balances protection with device startup demands. For instance, a fast-acting fuse has a steep curve, while a slow-blow curve tails off gently, allowing for temporary surges.
Understanding these time-current characteristics ensures you choose a fuse that safeguards your devices without unnecessary downtime or damage — a critical factor in reliable overcurrent protection. For more technical support on fuse applications and selection, you might find this technical support resource helpful.
Environmental Factors: The Derating Factor
Fuse ratings aren’t set in a vacuum—ambient temperature plays a big role. As the surrounding heat rises, the fuse element becomes more sensitive, meaning it may blow at currents lower than its nominal current. This happens because heat makes the fuse element weaker, reducing its ability to carry current safely. For this reason, a fuse rated for a certain amperage at 25°C might not handle the same load in a hotter environment without blowing prematurely.
Re-rating Calculation: Adjusting Fuse Choice for Operating Temperature Scenarios
To ensure reliable overcurrent protection, you need to apply a derating factor when selecting fuses for high-temperature conditions. This means choosing a fuse with a higher ampere rating than the system’s normal current to compensate for the ambient heat. Typically, manufacturers provide temperature correction charts or factors—like multiplying the fuse rating by 0.8 or 0.9 at 40°C—to calculate the right ampere rating.
Key steps for re-rating a fuse:
- Identify the maximum ambient temperature in your system environment.
- Check the fuse manufacturer’s derating chart for that temperature.
- Multiply your normal operating current by the derating factor.
- Select a fuse with an ampere rating that matches or exceeds the adjusted current.
This method protects against nuisance blowing while keeping your circuit safe.
For example, when integrating fuses with molded case circuit breakers or surge protective devices, such as those found in the GDM1 series, considering environmental factors ensures stable, long-lasting protection tailored to your setup.
Keep this derating practice in mind, especially in industrial or tropical climates where ambient temperatures regularly exceed standard test conditions.
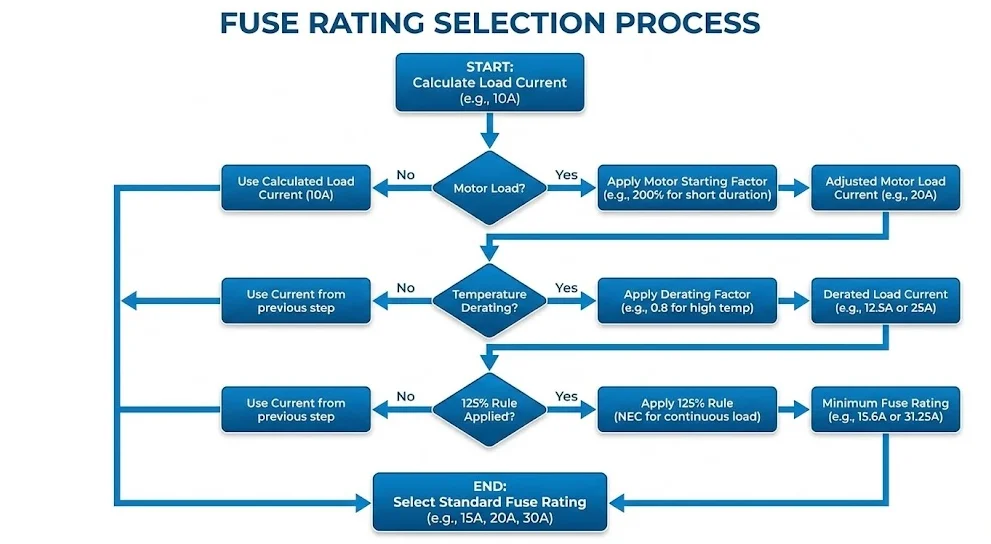
Step-by-Step Guide: Sizing a Fuse Correctly
Choosing the right fuse rating is key to reliable overcurrent protection. Follow these simple steps to size a fuse that fits your circuit perfectly:
Step 1: Determine Normal Operating Current
Identify the electrical load’s nominal current. This is the typical amperage your device or circuit uses under regular conditions.
Step 2: Apply Safety Margin (125% Typical)
Multiply the normal current by about 125% (or 1.25). This safety margin accounts for minor surges without nuisance blowing, keeping the fuse rating comfortably above the steady load.
Step 3: Check System Voltage
Match the fuse’s voltage rating to your system voltage. This prevents dangerous arcing and ensures the fuse safely interrupts fault currents in both AC and DC systems.
Step 4: Assess Inrush Currents to Pick Fast or Slow Blow
Check if your equipment has inrush current, like motors or transformers. Use a time-delay (slow-blow) fuse to handle these start-up surges without blowing prematurely. For sensitive electronics with low inrush, a fast-acting fuse is better.
Step 5: Verify Breaking Capacity
Confirm the fuse’s interrupting rating (short circuit current rating) exceeds the maximum possible short circuit current. This ensures reliable circuit breaking in fault conditions.
For quick, accurate selections, explore the GA&DA catalog integration which features a range of fuses with detailed specs. This tool helps you match ampere rating, voltage, and interrupting capacity all in one place, simplifying your fuse choice process.
If you’re working on sensitive power setups, consider referencing products like the G30-BC-15 surge protective devices for comprehensive system protection that complements proper fuse sizing.
Common Myths and Mistakes in Fuse Rating
When it comes to fuse rating, some common myths and mistakes can lead to serious issues.
Myth: Voltage doesn’t matter on fuses
Many believe the voltage rating is secondary, but it’s crucial. Using a fuse with a lower voltage rating than required can cause dangerous arcing when the fuse blows. This arcing might fail to interrupt the current properly, risking damage to your circuit or equipment. The voltage rating ensures the fuse can safely stop current flow without sparking.
Mistake: Relying on visual inspection for ceramic fuses
A ceramic fuse might look intact even after it has blown. Never assume visual cues tell the full story. Always use a multimeter to check continuity. This ensures accurate short circuit protection and avoids false assumptions about your fuse status.
Mistake: Using automotive fuses in high-voltage AC systems
Automotive fuses are designed for low-voltage DC circuits, typically 12V systems. Using them in high-voltage AC environments can be a recipe for disaster since their interrupting capacity and voltage rating are not suited for AC. This mistake can damage your electrical load and compromise overall overcurrent protection.
Understanding these common pitfalls helps ensure you select the right fuse rating for safety and reliability in your circuits. For more detailed selection tips, check out our guide on how to select the right fuse rating for electrical circuits.